


Convert your 2D Maglite to a 4,200 lumen LED power house. FULL instructions in the description.
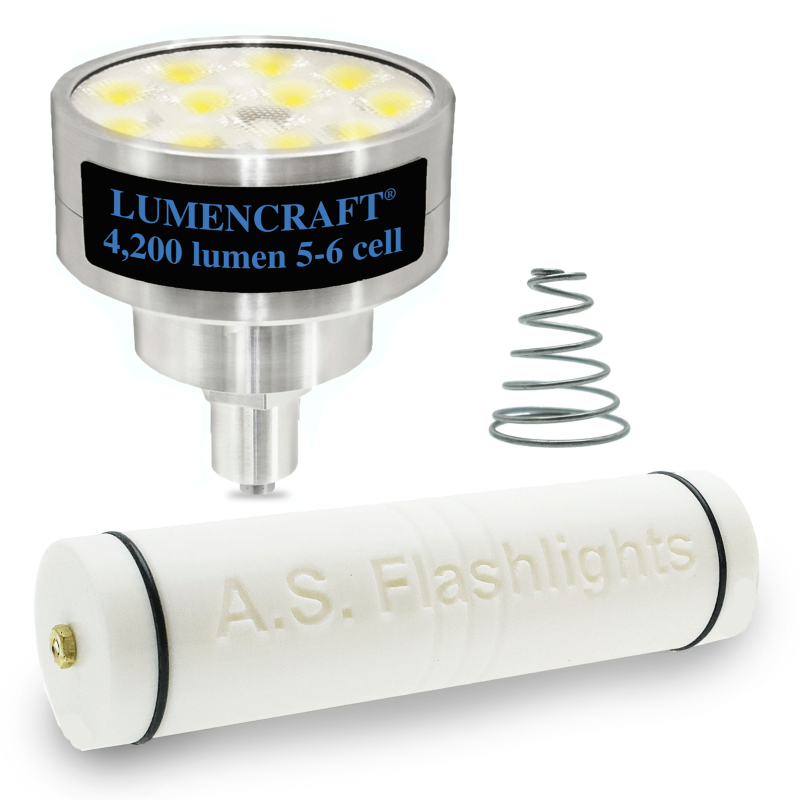
Kit Contents:
-5-6 Cell 12x LED Drop in (4,200 lumen)
-2x 26650 body sleeve
-Shorty spring
-2 pc 8mm x 2mm magnets
Kit converts incandescent Maglites to LED. Does NOT fit Maglites that are LED from the factory
1. You must use a pair of 26650 3.7v lithium ion batteries to do this conversion to a 2D size host. Regular 1.5v D cells will not work. The 26650 cells and needed charger can be purchased along with the kit but they need to be added to the kit by selecting them in the drop down menus.
2. If you want to use your own pair of 26650s you can, if they are capable of at least an 8 amp discharge and have raised button tops so that they make contact with each other end to end. Optionally you can use an 8mm x 2mm magnet in between the two of them. Lumencraft recommends using a pair of the Keeppower 5200ma protected button top cells because they fit perfectly and do NOT need the magnet for contact with each other.
3. In order to use the kit you must remove the anodizing from the inside of the tail cap (see video below) in the bottom for the short spring to make contact (it sits down inside the cap, not up high where the factory one does).
4. If you want to use the 2x26650 kit in a larger Maglite than 2D, just get the 2D kit and add dummy D cells in before you install the battery sleeve. Example a 4D light would need 2 dummy D cells and the 2x 26650 body kit.
This video outlines how to install the body kit.
If your Maglite is very old you can check to see if this bulb will fit YOUR maglite by doing this.
Installation and troubleshooting.
The bulb is a simple 3 mode Low, Medium, High with memory by default, however its easily customized for those who like a taste of something different.
The optional glass lens is hardened glass that is more resistant to breaking and scratching than traditional glass. A scratch free lens will have better light transmittance and is easy to clean.
User interface (2024 update):
DrJones Guppy2drv. This firmware allows the ultimate in user customizability, with 22 built-in mode groups, that the user can select via a series of button presses and the option of user programmable turbo timer that will automatically step the power down to 50% after the set time is hit (see below for instructions).
ML on the chart means Moon Light which is is less that one percent power.
User Selectable Groups:
Guppydrv Instructions
To switch mode groups: rapidly tap the switch 8 times, the light will then enter the programming mode and begin to flash. With the light in programming mode, tap the switch the same number of times as your desired mode group. The light will blink and your mode group will be memorized.
Example: To select mode group 3, tap the switch 8 times quickly to enter programming mode. As soon as the light enters programming mode and beings flashing, tap the switch three times. The light will blink to recognize the mode group change.
To set the turbo timer: rapidly tap the switch 8 times, the light will then enter the programming mode and begin to flash. With the light in programming mode, tap the switch 30 times to enter the turbo timer set mode. The light will then switch to 100% power. When the light is at the desired temperature for the turbo step down, turn the light off. The turbo timer will then be set. The turbo timer steps the light down to 50% regardless of the mode group set.
To disable the turbo timer simply go into program and cut it off in >3 seconds.
Here is a short video on how this UI works.
Disclaimer:
Lumencraft® is not affiliated with Mag instrument inc. which owns the MAG family of trade marks including Mag-Lite and Mini-Maglite. Lumencraft® products are not made, endorsed, recommended, licensed or approved by Mag instruments inc.
Convert your 2D Maglite to a 4,200 lumen LED power house. FULL instructions in the description.
Kit Contents:
-5-6 Cell 12x LED Drop in (4,200 lumen)
-2x 26650 body sleeve
-Shorty spring
-2 pc 8mm x 2mm magnets
Kit converts incandescent Maglites to LED. Does NOT fit Maglites that are LED from the factory