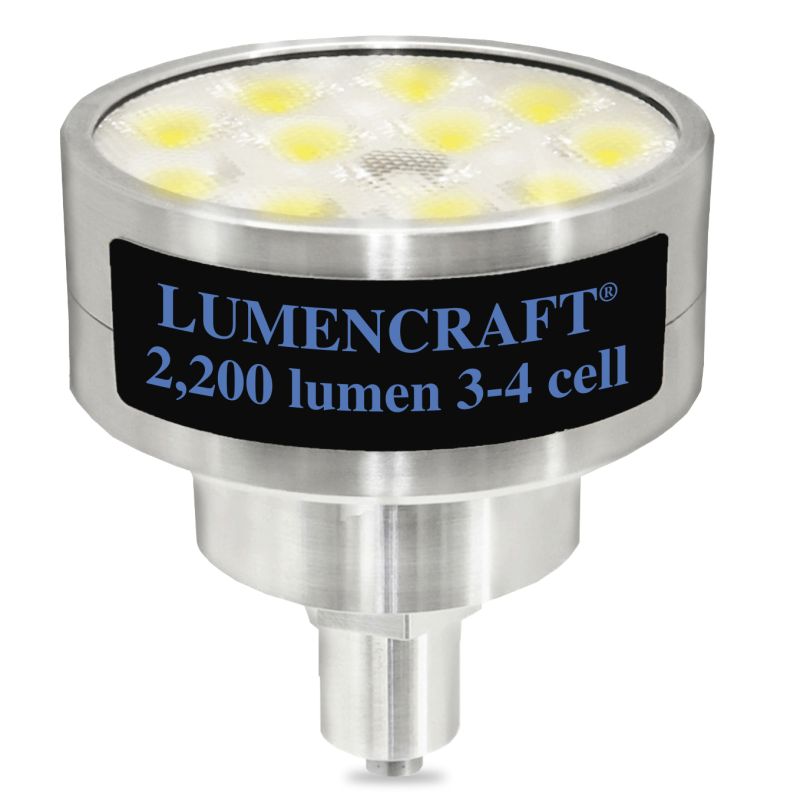


-2,200 lumen 12x Latticepower High Intensity LED Emitter replacement bulb for D cell Maglite
-Choose your own modes with custom user interface
-3-4 D cells, or 1 li-ion battery. 164 meter range (6,750 CD) 3 D cells=2,000 lumens, 4 D cells = 2,200 lumens
(can also be used in C cell Maglites if the "C cell adapter ring is purchased separately)
This upgrade converts incandescent Maglites to LED. Does NOT fit Maglites that are LED from the factory.
Instantly convert your incandescent Maglites into a SUPER POWERED LED flashlight! Twelve LED emitters and the Lumencraft 7135 driver pound out up to 2,200 retina searing lumens (output of the bulbs is based on use of NIHM rechargeable cells). Alkaline cells will power the bulb up at a reduced output so are best used as backup.
New in 2024. This bulb is not semi regulated. Our driver is made with 16x 7136 chips that now allow use of 3 or 4 D cell batteries. The board has a peak drive current of 6080ma. We're also using 12x Latticepower High intensity LEDs. These are a domeless /flat LED that give the bulb good range and output.
USER INTERFACE: By default the bulb is set to have 3 levels of brightness, Low, Medium, High. To select the output mode half press the Maglite switch until the light comes on, quickly let off and half press the switch again. Each time you do so the bulb will change output. Once you find the brightness level you want fully "click" the switch into place. The bulb will memorize the last mode used and come on in that mode when you power it back on. You can see a video on how it works by searching YouTube for "Adventure Sport user interface".
ADDITIONAL FUNCTIONS: You can also reprogram the bulb to a very wide range of other brightness levels and mode groups. A full set of instructions see the user interface description below.
HOW TO INSTALL: Start by unscrewing and removing the head of your Maglite flashlight. Next remove the factory reflector, bulb retaining ring and bulb from the switch tower (if you have the bi-pin bulb you can press down on the tower to eject the plastic bulb holder). Next remove the bezel and lens from the top of the Maglite head. Insert the 2,200 lumen bulb into the head. Place the lens over the drop-in and thread the bezel back down until snug. Screw the head back on to the maglite until it is just "snug" onto the body.
This bulb is for use with the voltage of 3-4 D cells, NOT More! 3-4x NIMH cells are best. (3-4 Alkaline cells will power the bulb, but at a reduced output. Maximum power will be reduced to around 50% using alkaline cells.)
If you want to use this in a larger mag like 5 or 6 cell you can fill up the extra space using these dummy batteries. https://lumencraft.com/-diy-parts/35-dummy-c-an-d-cell-batteries.html
If you want to use this in a 2D mag, you can do so using one 26650 Li-ion cell inside our conversion sleeve. https://lumencraft.com/led-upgrades-for-maglite/82-8204-26650-body-sleeve-for-maglite.html#/94-size-1_x_26650_to_2d_cell/96-hardened_scratch_resistant_glass_lens-no
NEVER use the 2,200 lumen drop-in with more than one 26650 cell!
If your Maglite is very old, you can double check to see if this bulb fits it by doing this.
Installation.
In addition to the astounding output the new version of Lumencraft dropin comes with the most flexible user interface to date. Created by BLF member DrJones this UI has something to offer for everyone.
The bulb is a simple 3 mode Low, Medium, High with memory by default, however its easily customized for those who like a taste of something different.
Run time approximation:
High: 50 min
Med: 3.5 hours
Low: 87 hours
User interface (2024 update):
DrJones Guppy2drv. This firmware allows the ultimate in user customizability, with 22 built-in mode groups, that the user can select via a series of button presses and the option of user programmable turbo timer that will automatically step the power down to 50% after the set time is hit (see below for instructions).
ML on the chart means Moon Light which is is less that one percent power.
User Selectable Groups:
Guppydrv Instructions
To switch mode groups: rapidly tap the switch 8 times, the light will then enter the programming mode and begin to flash. With the light in programming mode, tap the switch the same number of times as your desired mode group. The light will blink and your mode group will be memorized.
Example: To select mode group 3, tap the switch 8 times quickly to enter programming mode. As soon as the light enters programming mode and beings flashing, tap the switch three times. The light will blink to recognize the mode group change.
To set the turbo timer: rapidly tap the switch 8 times, the light will then enter the programming mode and begin to flash. With the light in programming mode, tap the switch 30 times to enter the turbo timer set mode. The light will then switch to 100% power. When the light is at the desired temperature for the turbo step down, turn the light off. The turbo timer will then be set. The turbo timer steps the light down to 50% regardless of the mode group set.
To disable the turbo timer simply go into program and cut it off in >3 seconds.
Here is a short video on how this UI works.
Disclaimer:
Lumencraft® is not affiliated with Mag instrument inc. which owns the MAG family of trade marks including Mag-Lite and Mini-Maglite. Lumencraft® products are not made, endorsed, recommended, licensed or approved by Mag instruments inc.
-2,200 lumen 12x Latticepower High Intensity LED Emitter replacement bulb for D cell Maglite
-Choose your own modes with custom user interface
-3-4 D cells, or 1 li-ion battery. 164 meter range (6,750 CD) 3 D cells=2,000 lumens, 4 D cells = 2,200 lumens
(can also be used in C cell Maglites if the "C cell adapter ring is purchased separately)
This upgrade converts incandescent Maglites to LED. Does NOT fit Maglites that are LED from the factory.